No matter where you are in the world, you’ve probably heard of a coconut. This well-known fruit originated in tropical environments and is the fruit of some palm trees. It is filled with liquid that can be drunk or used in various recipes. It also contains white meat that many people enjoy eating on its own or incorporated into different dishes.
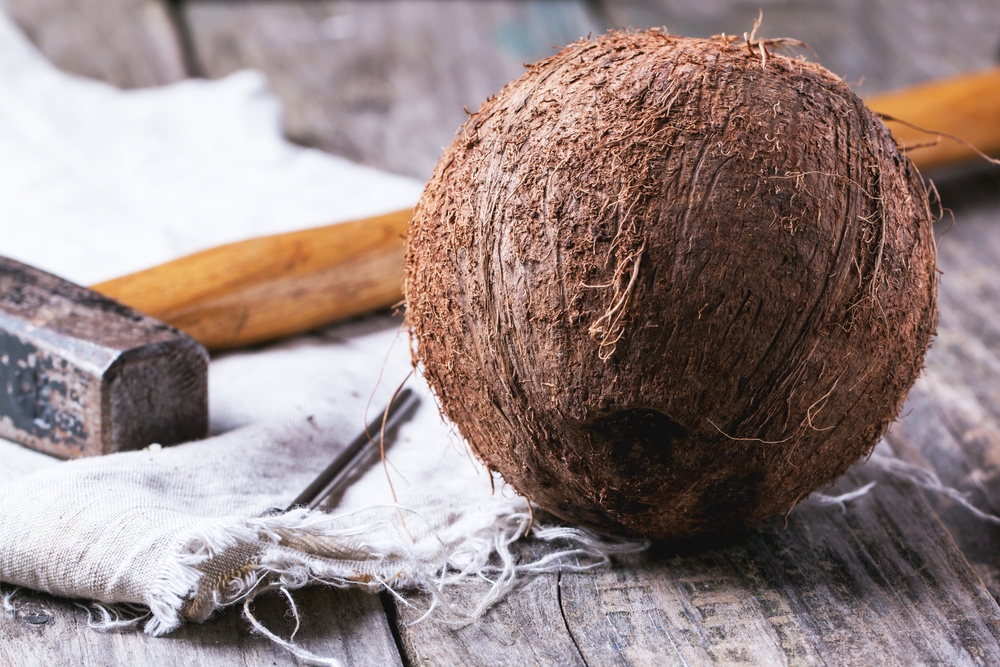
The one difficult part about coconuts is getting them out of their shell. If you buy a coconut in its raw form you will have to crack open the shell and pry the meat out, a process that can take a long time and be frustrating. Fortunately, there is an easy method that you can use to get the coconut out of its shell as easily as possible.
To get a coconut out of its shell you will first need to drain the coconut water by piercing through one of the eyes. Then you will open the shell by tapping along the equator of the coconut with a hammer. After the coconut is open you can remove the meat using a sharp knife.
The very first step to getting coconut meat out of the shell is to drain the liquid. The liquid inside is referred to as coconut water and its purpose is to nourish the fruit while it is growing and keep the inside moist for the meat.
Technically, draining the coconut is not necessary before cutting it. However, if you’d like to preserve the coconut water it’s an important step so the water doesn’t spill everywhere when you break the shell open.
If decide to save the coconut water you can filter it and drink it as is for a refreshing electrolyte drink. If you prefer a richer flavor you can blend the fresh coconut water with coconut meat to create coconut milk which can be used in smoothies and curries or drunken plain.
Locate the Eyes
The first step in draining your coconut is to locate the eyes. These are the softest part of the coconut’s shell and are where roots would eventually grow if the coconut germinated. They will look like three dark indents on the coconut shell and should be pretty obvious.
Pierce the Eye
Now that you’ve located the eye it’s time to determine which the softest is. Usually, two of the eyes will be harder and one will be soft allowing you to poke a hole through it relatively easily. To figure out which is the softest eye take a small knife and poke at each hole.
Once you’ve figured out which eye is the softest you’ll want to pierce it. This can be done using a small knife or you can use something like a clean screwdriver to pierce through the eye. If the eye is difficult to get through you can use a hammer to gently tap the end of your tool to force it through the eye.
Another easy way to do this is by using a drill with a round bit to drill a hole through the eye of the coconut. The one downside to using this method is that more coconut shell debris will end up in the coconut water and it could crack the shell if done too quickly. However, as long as you drill slowly and filter the coconut water after it’s drained you should be good to go.
Make sure to be careful as you’re doing this, especially if you’re using a knife. If you apply too much force your knife could slip and you could cut your hand leading to a trip to the emergency room. Also, be careful when applying force with a hammer. If you apply too much force too soon the coconut could crack and the water could spill out.
Drain the Coconut Water
After you’ve pierced a hole through one of the eyes you can drain the water. Do this by flipping the coconut upside down over a bowl and letting the water gradually drain out.
Since there’s only one hole this could take a while but all of the water should eventually drain out. If you want the water to drain out more quickly you can pierce a hole through the other eyes as well.
After the coconut water has been drained you should refrigerate it immediately. That way it stays fresh so you can drink it later on or use it in recipes.
Cutting the Coconut in Half
Now that all the water has been removed from the coconut, it is time to crack the coconut in half. This is one of the more tedious steps and needs to be done carefully to avoid accidental injury.
Make sure to take your time cracking the coconut in half. If you do it too quickly and don’t let the coconut open naturally you could risk shattering the coconut which will break apart the meat and make it more difficult to remove in one piece.
To cut the coconut in half you will need:
A large hammer
A large knife
Find the Equator
Every coconut has what is known as the equator. This is the part of the coconut’s shell that is weaker than the rest and will separate when pressure is applied.
To find this line carefully inspect your coconut, this may be more difficult if your coconut has a lot of hair as it can conceal the line. The equator of the coconut should look like a ridge that extends all the way around the coconut.
Once you have identified the equator you are ready for the next step.
Now that you’ve located the equator of the coconut take your hammer and firmly tap all along the line of the equator. Use firm pressure but don’t get carried away and start swinging away at the shell. This could cause the shell to break into multiple pieces instead of a clean breakdown in the middle.
Make sure you go through multiple rotations tapping on every part of the equator. After several rotations, you should start to hear a cracking sound. Continue to tap along the line until it begins to crack open and the halves come away from each other.
Pry it Apart
Some coconuts may fall apart easily after several rounds of tapping on the equator. However, others will be more stubborn and need a bit of extra effort to open.
If your coconut isn’t coming apart easily use a strong knife to work your way around the seam prying it apart gently. Do not attempt to use the knife to crack the coconut open, the knife could easily slip and cut you.
If the coconut still won’t come apart with some prying you’ll want to return to step 2 and keep tapping until the shell has weakened further. Then you can return to this step and try prying it apart again.
This is the most difficult part of opening a coconut shell and can take quite some time. Make sure to dedicate a lot of time to it before giving up and breaking the shell into multiple pieces.
After your shell is in two halves it is time to remove the meat and prepare it for consumption.
Removing the Meat
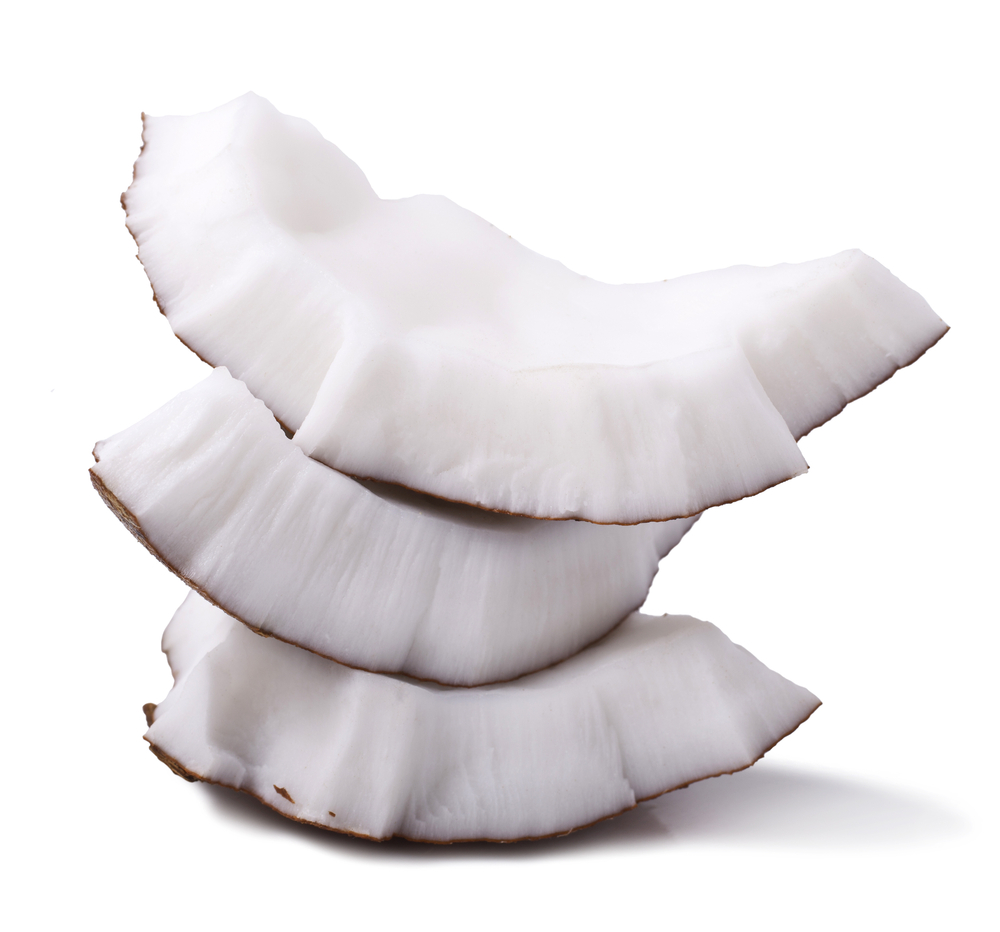
The last step is removing the meat from the coconut shell. The meat is the white flesh that lines the inside of the coconut shell and is the part most people consume. It can be eaten plain or it can be dried and used as a topping. You can also use coconut meat to make coconut cream, coconut milk, and coconut oil.
To remove the meat from your coconut you will need a sharp knife to cut the meat and a strong, dull knife to pry the meat out of the shell.
Pick Your Knives
The most important step in removing the meat from a coconut shell is picking a good knife. For your sharp knife, you’ll want a short-bladed knife that has rounded edges. This will help cut just the coconut without cutting into the tough shell. Paring knives are usually a good option for this step as they are strong but short enough that they are easy to handle.
For your dull knife, you’ll simply want a knife with a thick blade that goes down into the handle. You don’t want to risk your knife breaking because the blade was only attached to the top of the handle.
Start Cutting
Now that you have your knives it’s time to start cutting. To do this you’ll want to take your sharp knife in your dominant hand and make two cuts into the coconut meat so it forms an upside down V shape. Don’t make the strip too thick or it will be difficult to pull out, a maximum of 2 inches across is best for the first couple of pieces.
Make sure to cut all the way down to the shell. If you don’t cut deep enough part of the coconut meat could break off and stay stuck to the shell at which point they will be very difficult to remove.
Pry the Meat Out
After you’ve cut a piece out you will take your dull knife and start to pry it out. This will take some effort and you may have to try a couple of different angles before you find the one that will work. Generally speaking, the best method is to slide the dull knife between the meat and the shell and then pry it out.
Continue Until Shell is Empty
Now you will continue cutting pieces and prying them out until the shell is completely empty. As you remove coconut slices you may notice that the rest of the meat becomes looser and you can pry out larger and larger pieces. Just make sure to be careful and only use the dull meat for prying to avoid the knife slipping and cutting yourself.
Conclusion
The next time you’re in the store and see a pile of coconuts in the produce section, don’t feel intimidated. With just a few simple tools and a lot of patience, you can open up your own coconut and enjoy delicious fresh coconut meat.
To open your coconut you will first want to drain the water out through one of the eyes. You can either discard this water, drink it, or use it to make fresh coconut milk. After that’s done you will use a hammer to crack the shell along its center ridge, the weakest part of the coconut. This should leave the coconut in two halves.
After that, all you’ll have to do is pry the meat out using a sharp knife for cutting and a dull knife to work the meat out. Then you’ll have plenty of fresh coconut meat to enjoy.